Quarkus Basic Authentication using MongoDB

 Quarkus Basic Authentication using MongoDB


Introduction

Quarkus is a great and modern java based framework. Quarkus has a great document in https://quarkus.io . In the guides, security related guides are provided for JPA only. But other document based databases can be also used for basic authentication. In this blog, we are going to see how to create a basic authentication using Quarkus and MongoDb. Though we are showing here examples using MongoDb database, other document based databases can be used following the same procedure. 


Dependencies

We need to have the following dependencies for our example:


    <dependency>
      <groupId>io.quarkus</groupId>
      <artifactId>quarkus-resteasy-reactive-jackson</artifactId>
    </dependency>
    <dependency>
      <groupId>io.quarkus</groupId>
      <artifactId>quarkus-resteasy-reactive</artifactId>
    </dependency>
    <dependency>
      <groupId>io.quarkus</groupId>
      <artifactId>quarkus-mongodb-panache</artifactId>
    </dependency>
    <dependency>
      <groupId>io.quarkus</groupId>
      <artifactId>quarkus-security</artifactId>
    </dependency>
    <dependency>
      <groupId>io.quarkus</groupId>
      <artifactId>quarkus-elytron-security-properties-file</artifactId>
    </dependency>


quarkus-rectesy-reactive-jackson is required for exposing the rest services, quarkus-mongodb-panache is required for using mongodb along with panache query system, quarkus-security is required for declaring custom identity provider (for authentication purpose) and quarkus-elytron-security-properties is required for hashing plain password.


Configuring Properties file

We my set up our mongo instances by installing mongodb in our local system or using docker. But here we are going to use MongoDb as dev services which is provided by Quarkus by default. Just we need to mention these properties in the application.properties file.


quarkus.mongodb.devservices.enabled=true
quarkus.mongodb.devservices.image-name=mongo
quarkus.mongodb.devservices.port=27017
quarkus.mongodb.database=TopicLabeling


Here we enabling the mongodb dev services using mongo docker image and assigning port and Database name. 


Model

For our example, we declare a User entity using the following procedure.


import java.util.Optional;
import java.util.Set;

import org.bson.codecs.pojo.annotations.BsonProperty;

import io.quarkus.elytron.security.common.BcryptUtil;
import io.quarkus.mongodb.panache.PanacheMongoEntity;
import io.quarkus.mongodb.panache.common.MongoEntity;

@MongoEntity(collection = "app_user")
public class User extends PanacheMongoEntity {
    @BsonProperty("username")
    public String username;
    @BsonProperty("password")
    public String password;
    @BsonProperty("roles")
    public Set<String> roles;

    public static void add(String username, String password, Set<String> roles){
        User user = new User();
        user.username = username;
        user.password = BcryptUtil.bcryptHash(password);
        user.roles = roles;
        user.persist();
    }

    public static Optional<User> getByUsername(String username){
        return User.find("username", username).singleResultOptional();
    }
}


Here we are declaring two methods, add is used for adding a new user and getByUsername is used for fetching the username specific information.


Security IdentityProvider

In order to handle the basic authentication, we need to implement IdentityProvider  interface and the IndentityProvider must be of type AuthenticationRequest. As we are going to validate username and password provided in the basic auth, so we are going to use the UsernamePasswordAuthenticationReqeust (implementation of AuthenticationRequest interface). We name our custom IdentityProvider as ApplicationIdentityProvider and the initial structure looks like as:


import java.util.Optional;

import javax.enterprise.context.ApplicationScoped;

import com.morshed.security.model.User;

import io.quarkus.elytron.security.common.BcryptUtil;
import io.quarkus.security.AuthenticationFailedException;
import io.quarkus.security.identity.AuthenticationRequestContext;
import io.quarkus.security.identity.IdentityProvider;
import io.quarkus.security.identity.SecurityIdentity;
import io.quarkus.security.identity.request.UsernamePasswordAuthenticationRequest;
import io.quarkus.security.runtime.QuarkusPrincipal;
import io.quarkus.security.runtime.QuarkusSecurityIdentity;
import io.smallrye.mutiny.Uni;

@ApplicationScoped
public class ApplicationIdentityProvider implements IdentityProvider<UsernamePasswordAuthenticationRequest>{

    @Override
    public Class<UsernamePasswordAuthenticationRequest> getRequestType() {
        // TODO Auto-generated method stub
        return null;

    }

    @Override
    public Uni<SecurityIdentity> authenticate(UsernamePasswordAuthenticationRequest request,
            AuthenticationRequestContext context) {
        // TODO Auto-generated method stub
        return null;
    }
 
}


First we need to getRequestType() method return type as UsernamePasswordAuthenticationRequest.class. So the method now looks like this:

    @Override
    public Class<UsernamePasswordAuthenticationRequest> getRequestType() {
        return UsernamePasswordAuthenticationRequest.class;
    }


authenticate method is responsible for validating the username and password. The request parameter contains username and password sent in the basic auth request. We need to validate the provided password with the existing hashed password. After adding the features, our authenticate method looks like this:


    @Override
    public Uni<SecurityIdentity> authenticate(UsernamePasswordAuthenticationRequest request,
            AuthenticationRequestContext context) {
        Optional<User> user = User.getByUsername(request.getUsername());
     
        if(user.isPresent()){
         
            if(BcryptUtil.matches(String.valueOf(request.getPassword().getPassword()), user.get().password)){
                return Uni
                .createFrom().item(QuarkusSecurityIdentity.builder()
                .setPrincipal(new QuarkusPrincipal(request.getUsername()))
                .addCredential(request.getPassword())
                .setAnonymous(false)
                .addRoles(user.get().roles)
                .build());
            }           
            throw new AuthenticationFailedException("Username-password doesn't match");

        }
        throw new AuthenticationFailedException("Username not found");
    }

The implementation is pretty straight forward. Here we are first fetching our existing user. If the username related information is not found, then we through an exception (Username not found). If user is found then we validate the password using BcryptUtil.matches method. If the matching is passed, then we pass SecurityIdentity by using QuarkusSecurityIdentity.builder() method. Here the default implementation uses the reactive approach (Uni), so we used Uni.createFrom().item(QuarkusSecurityIdentity.builder.build()).


Testing

Here, we are not going to run any Unit tests or Integration tests, rather we will create an authenticated rest end point and test the endpoint whether the endpoint is accessible using the basic auth or not. First, we need to define a rest endpoint. I am going to use the following resource for testing.


import javax.ws.rs.GET;
import javax.ws.rs.Path;
import javax.ws.rs.Produces;
import javax.ws.rs.core.MediaType;

import io.quarkus.security.Authenticated;

@Path("/hello")
@Authenticated
public class GreetingResource {

    @GET
    @Produces(MediaType.TEXT_PLAIN)
    public String hello() {
        return "Hello from RESTEasy Reactive";
    }
}

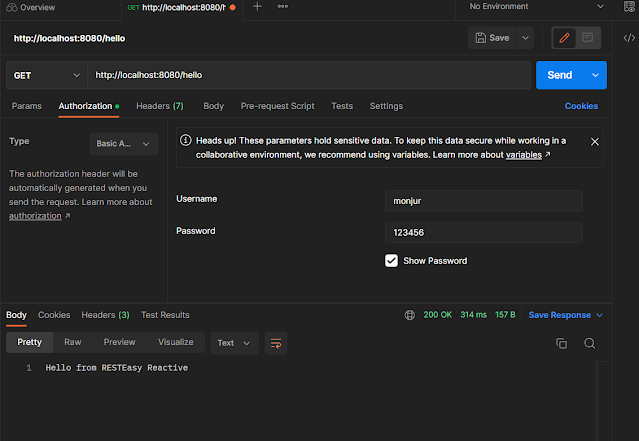
Note here that we added @Authenticated annotation in the class so the resource or endpoint (“http://localhost:8080/hello”) is now an authenticated endpoint and we need basic auth for accessing the api. 


Before testing through postman, we need to insert an user. So we added the following class so that if no user data is found, then an user will be added in the database. Here we used the StartupEvent for running the startup codes. 


import java.util.HashSet;
import java.util.Set;

import javax.enterprise.event.Observes;
import javax.inject.Singleton;

import com.morshed.security.model.User;

import io.quarkus.runtime.StartupEvent;

@Singleton
public class Startup {
 
    public void createUsers(@Observes StartupEvent evt){
        if(User.count() == 0){
            Set<String> roles = new HashSet<>();
            roles.add("admin");
            User.add("monjur", "123456", roles);
        }
    }
}

Now, we need to call the api using Postman. The postman-test scenario is shown in the following image.


So, using the above mentioned steps, we can easily create a mongodb based authentication system using Quarkus.


Complete source code can be found at the following git link:


monjurmorshed793/quarkus-mongodb-basic-auth (github.com)


Thanks for reading the blog. 


Comments

Popular posts from this blog

Quarkus-MongoDB: Importing CSV files using Liquibase